Wrap and Ping-pong node basics
Say you have a particle system, and you’d like the particles to all pulse either all at the same time, or independently from one another. An elegant method of achieving this is with the Wrap and Ping-pong Math nodes.
These nodes have similar functions, where upon a value exceeding a specific increment, it will either snap back to the minimum value, or reverse course back to that value. Here are some examples:
So much as we normally handle things in Blender, 0=black, 1=white, and with that knowledge we can do a lot of different things. A major thing to understand about the Wrap and Ping-pong nodes, however, is that whatever min and max values you input, it will be the wrap point. So if you set the max value (for Wrap) or the scale value (for Ping-pong) to 0.25, that means that every increment of 0.25 in that value will cause the value to snap back to its minimum value, or reverse course back to that minimum value. That also means it’ll never reach that maximum of 1, which we do want, since 0 to 1 is a much easier and standardized way of controlling various effects and animations.
This is important to know because in order to make something pulse faster than increments of 1, you will need the Map Range node. With this, we can revert that scaling back from 0 to 1, instead of say, 0 to 0.25, but still keep the faster speed. See below:
With this, you are able to make shader effects that can pulse or wrap around a specified value, and control that speed for the entire shader effect.
Age and lifetime particle attributes
A very common method of controlling particle shader effects is using their age and lifetime attributes. The idea is to divide age by lifetime, so that a particle begins at a low value, and ends at a value of 1. For example, if a particle’s age is 1, and its total lifetime is 24, on the first frame of its life, age/lifetime will be 0.041667…, and on frame 24, age/lifetime will yield a value of 1. This little trick lets you have different values for each individual particle that are dependent on that particle’s frame of emission.
For the standard particle system, this can be accessed with the Particle Info node, though this also works for Geometry Nodes particles, provided their attributes are set up correctly. One major caveat of the Particle Info node is that it only works in Cycles. If you’re using EEVEE, you either have to give up on Particle Info-based effects, or you have to use a particle system made in Geometry Nodes. Luckily for you, I have one in the downloads page! Get it here.
For this tutorial, I’ll be using my own Geometry Nodes particle system, but the principle is the exact same: take age, and divide that by lifetime to create a progression from 0 to 1.
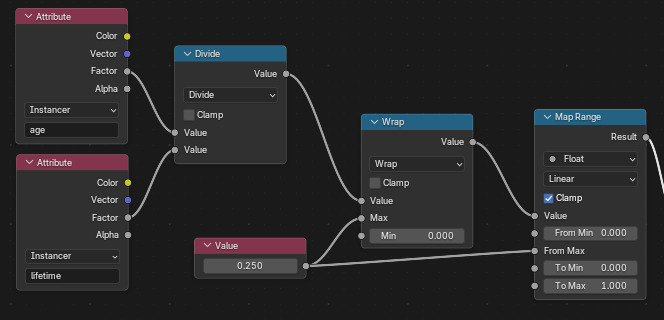
This is the simplest setup you can have to create this sort of pulsing effect. You get the age and lifetime attributes, connect to a divide node, then connect that to Wrap. I also use a Value node so I can control both the Wrap Max and the Map Range From Max with a single value.
Then you take the Result output and plug into whatever effect you want. See some examples below!
So now, you can create a bunch of animations on your particles, provided that they rely on that 0 to 1 range, which you can totally do with a Float Curve! Here’s an example:
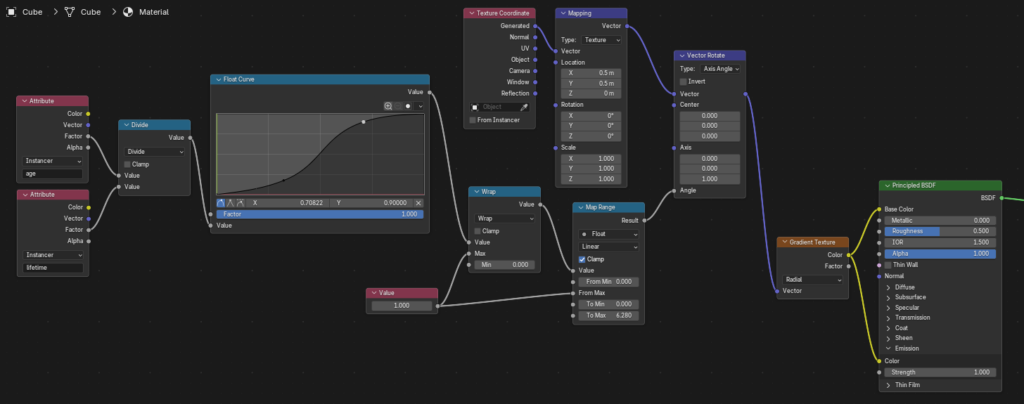
Now go have fun with particles and shaders :>
Leave a Reply